The application scope of the airbrush is indeed vast, extending beyond mere spraying and painting techniques. Its versatility allows it to be employed in a diverse range of artistic pursuits, including nail art spraying, tattoo artistry, cake decoration, and even the spraying of intricate crafts and models. Whether it's the intricate patterns of nail art, the unique designs of tattoos, or the exquisite details of cakes and crafts, the airbrush adds a captivating touch of brightness to these creations, demonstrating its boundless artistic allure.
Our friend, baker__builds, is good at fishing lure making. He has masterfully harnessed the capabilities of the NEOECO airbrush to create a distinctive spraying effect on the lure bait model. This serves as a testament to the airbrush's exceptional performance in the realm of model making.
The Process
- With precision and accuracy, we create a lure bait model utilizing cutting-edge 3D printing technology. Alternatively, we can opt to purchase a ready-made model. Subsequently, we securely affix it to a dedicated stand, ensuring stability and ease of access for the subsequent painting process.

-
We select the pearl satin gold pigment and, using the SJ83 airbrush, apply a thin yet even layer to the entire lure bait model. During this process, we pay utmost attention to achieving a uniform coating, striving to impart an alluring golden glow to every intricate part.

-
We have selected the olive green deep pigment and used the SJ83 airbrush to apply a precise coating to the dorsal fin of the lure bait. This step makes the dorsal fin of the bait even more vivid and realistic, adding a natural green hue to its overall appearance.

-
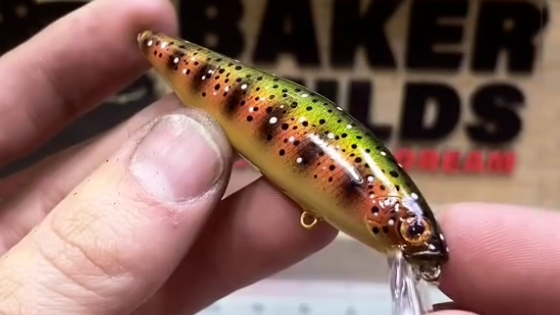
We chose brite red paint and evenly sprayed it on both sides of the fish bait model, making it emit a vivid red effect. Then, we skillfully added several black circles on both sides of the fish bait model, adding mysterious and eye-catching details. These black circles not only enhance the layered effect of the fish bait but also make the overall appearance more vivid and realistic.

-
Next, we used a nail art dotting tool to gently dip into black paint and decorate the lure fishbait model with numerous dots, creating a unique pattern. Subsequently, we dipped into white paint and skillfully added a few white dots, adding a touch of freshness and vitality to the lure. The addition of these dots not only enriched the visual effect of the lure but also made the overall design more lively and adorable.

-
We skillfully affixed the purchased lure fish eye model to the fishbait model, adding realistic eye details that made the overall design more complete and vivid.

-
Finally, we placed the carefully crafted lure fishbait model into the pre-prepared UV glue, ensuring that the model was evenly coated with the adhesive. Then, we used a UV lamp to irradiate it, allowing the glue to quickly cure until the model was completely dry. This step not only enhanced the durability of the model but also gave it a unique gloss effect, making thelure fishbait model even more perfect.


Such a delicate and realistic lure fish bait model has been created. 
If you're interested, you can also try to DIY a lure. It will be a very interesting process!