Welcome, friends, to NEOECO Airbrush!
I am thrilled to present to you our NEOECO NCT-SJ81 airbrush kit. In this article, we will explore the contents of the box, the purpose of each item, the assembly process, and even conduct a simple test of the airbrush. We created this article in response to numerous inquiries from our NEOECO customers on platforms like Reddit and through email. Our goal is to provide valuable assistance and help our customers gain a better understanding of our product.

First and foremost, I want to mention that this particular product is currently exclusively available on Amazon.com and neoeco-airbrush.com. For your convenience, I have provided the link here in case you haven't purchased one yet. Now, let's dive right in!

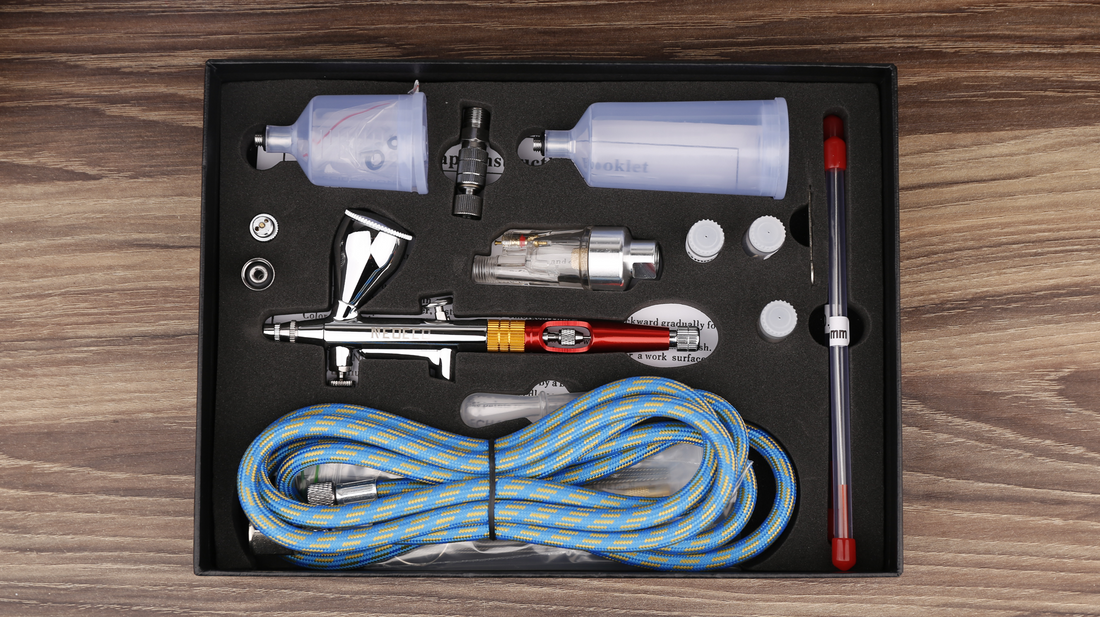
The NEOECO NCT-SJ81 airbrush kit comes in a black container box that some people mistook for a compressor due to its appearance. However, let me clarify that this box is purely for storage, and there is no compressor included in the kit. Now, let's open the box. Wow, there are so many items here. Considering the price of $40, it's amazing to receive all these components. With $40, you can't even buy a standalone airbrush. It’s quite a deal.

Now, let's focus on the airbrush itself. We will discuss the other items shortly. Take a look at this handy tool. It's a quick disconnect coupler with 1/8" BSP female threads on both sides. What is it used for? Sometimes we need to disconnect the airbrush for cleaning or switch to a different airbrush with various colors. In such situations, instead of unscrewing the airbrush from the hose, which can be quite troublesome, this coupler comes to the rescue. For example, if we want to switch from this airbrush to another one, we simply pull it down, remove the top part, and attach the other airbrush. It's that easy! This little tool makes changing airbrushes a breeze, and I highly recommend it. It's incredibly useful.

Moving on, let's talk about the moisture trap. It effectively filters dirt and moisture from the air supply. Take a look inside, and you'll notice the yellow filter. Both sides of the trap feature 1/8" BSP threads, with one side being female and the other male. You can connect it after the quick disconnect coupler or directly to the compressor. Either way works since the air needs to flow through the entire path.

Now, let's discuss the 0.2mm and 0.5mm replacement nozzles, along with the air cap. Additionally, we provide spare needles. The original needle and nozzle installed on the airbrush are 0.3mm, and these spare parts are for specific tasks that require them. However, I must caution you that the nozzle is quite delicate, so please handle it with care while screwing or unscrewing to avoid any damage.

We also include spare cups—one large and one small. Inside the small cup, there's a pleasant surprise: a sealing set! This is quite convenient as you often need to purchase sealing parts separately. With this kit, we've got you covered.

Now, take a look at this normal needle protective cap. The original cap on the airbrush is a crown cap, but this normal cap serves the purpose of protecting the needle from damage. Without a cap, the needle can easily bend upon impact. The crown cap also prevents paint buildup, reducing the frequency of cap cleaning.

Let's move on to the air hose. It is beautiful. Some customers have emailed us, noting that their compressor has a 1/8" BSP thread, while this side has a 1/4" BSP thread. In such cases, you can simply detach this part by unscrewing it if you don't need it.

Next, we have cleaning accessories, which are quite useful. Here we have cleaning needles. You can insert them into the appropriate hole, and there's a brush included, so you don't have to worry about damaging your airbrush. Use it to clean the fluid cup, the needle protective cap, and any other areas you want to clean on the airbrush. Very handy indeed. The cleaning brush serves a similar purpose, but we won't go into detail about it here.

Ah, and this golden bar—it seems well-made. It serves two functions. Firstly, it's great for cleaning paint residue. Secondly, and this is important because many beginners aren't aware of it, you can use it to unscrew a broken part if the nozzle accidentally gets broken inside the airbrush. Insert the reamer and twist counterclockwise to easily remove the broken part. This tool is truly invaluable.

By now, we have introduced all the accessories, and I hope you have gained a good understanding of them.
Now, let's shift our focus to the airbrush itself. Just take a look at it—the craftsmanship is superb, and it has a beautiful design. One standout feature of this airbrush is its tension adjustment function. The gold ring in the middle is not merely decorative, as is often the case with other companies. You can turn it to adjust the trigger's tightness. Clockwise makes it slightly tighter, while counterclockwise makes it lighter. This allows for fine adjustments. It's a useful feature that enhances control.

Additionally, the airbrush features a cut-away handle and a MAC valve, which are commonly seen in many other airbrushes and not unique to ours. A tip I'd like to share is to remember to twist the chucking nut a quarter turn to ensure that your skin won't come into contact with it, providing a more comfortable grip.

Another advantage is the quick flush function. When you need a burst of air, you can pull back the needle chucking nut, and you'll get the burst you need. It's particularly useful when cleaning the airbrush. Add cleaner, pull it back, and the cleaner will be flushed out quickly. Lastly, we have the MAC valve, which allows you to adjust the pressure by twisting it. Clockwise increases the airflow, while counterclockwise reduces it. A great feature, indeed!

In the second part, let's conduct a simple test to evaluate two essential aspects of an airbrush: detail ability and atomization. As a multipurpose airbrush, it should excel in both areas. Let's get started!
First, we will assess its atomization by testing it on a spoon. Wow, the color looks beautiful!

Next, we will evaluate its detail capability by testing how thinly it can spray.


Okay, these are all the things I wanted to share with you in this video. Please comment below with any suggestions you would like us to cover, and we will make an effort to address them.